Update Information
Welcome to join Telegram Group Synology Nvidia GPU for exploration together.
20230919
- Fixing the issue where using vGPU on DVA series models prevents the system from booting.
20230916:
- Fix GPU display statistics for most DSM models (after installing the driver according to the instructions below, a restart is required for the changes to take effect).
- Support for the official synology.
- Fix initialization issues that may occur with some graphics cards.
- Perform extensive testing on more graphics cards.
20230906: Attempting to support Official Synology.
20230902: Fixed GPU usage/statistics display for all models.
20230827: Fixed the issue where Docker may not function properly after machine restart, and resolved potential driver abnormalities.
20230826: Successfully tested graphics cards 1050, p4, 40hx, 2080, and 2080ti on physical Synology DS918+. Failed to test White Group and 1650 on DS1821+ (no plans for support at the moment).
20230818: Support for all X86, 4.0 model vGPU, and passthrough (DVA3221, DVA3219). Direct physical installation of Synology is temporarily not adapted (but may be supported). Tested supported models: DVA3221, DVA3219 (Xiu'er), DS918+, DS923+; looking forward to testing and contributions from friends.
20230812: Theoretical support for DVA model vGPU, passthrough, and physical Synology, awaiting further data validation.
Share Like Dislike
Plan
- Various bug fixes for the initial version.
- System gameplay testing for the 40hx.
- Attempting to support more Synology verification.
- Synology AI functionality for Pascal version.
- Synology AI functionality for Turing version.
Conclusion
The conclusion is that currently on the DVA3221 platform, vGPU version 14.4 (510.108.03) has been adapted. The underlying system requires a version greater than or equal to (510.108.03), which means that versions 510 to 535 theoretically can be used. In the Synology system, this driver needs to be installed. Testing has been conducted with Tesla P4 and 2080Ti, covering various aspects such as Docker, OpenGL, encoding/decoding, and Synology AI recognition. As the Photos app on DVA3221 does not utilize the GPU, this package does not affect that functionality. The goal is to... (The rest of the sentence is missing. Please provide the complete sentence or information you would like to convey.)
Version 1: The package size is around 350MB, and it is unable to utilize the Synology AI functionality for monitoring. However, all other functionalities are working normally.
Version 2: The package size is around 750MB, and it fully enables all GPU functionalities in Synology, including the Synology AI functionality.
Currently, there are still some unresolved issues regarding AI monitoring. Please allow me some time to organize the conclusions and share them with you later.
KeyWords:synology nvidia vGPU GPU
Introduction
Recently, the members of the Foxi Group have been discussing whether Synology NAS can utilize Nvidia vGPU for tasks such as transcoding, facial recognition, and AI. Based on the discussion, it seems that currently it is not possible. However, I have a strong interest in both Synology's system and vGPU technology, and with the support of the Fosi Group leader, Xiu'er, and a few other experts, I embarked on an exploration journey. After two weekends and some spare time, I have reached a clear conclusion regarding Synology's support for vGPU -> it is supported, but with some limitations. The exploration process has been challenging and time-consuming, and I understand that most readers might not be interested in the details. Therefore, I will skip to the main topic and begin with the installation process.
Installation Process
Here is a brief overview of the installation process:
- Create a Synology virtual machine (VM) on PVE/ESXi/Unraid or similar host platform (Do not assign vGPU to the VM at this stage).
- Install the Synology VM as usual.
- Uninstall the system's built-in NVIDIARuntimeLibrary (if present).
- Install the driver provided by "pdbear" (vgpuDaemon fix & stop & start).
- Shut down the Synology VM.
- Assign the vGPU to the Synology VM and then start the VM.
Attention:If you have already installed the current version of the driver and are using it, follow the steps below to upgrade to the latest version:
- Uninstall the current driver (This step is crucial and must be done first).
- Install the updated version of the driver provided by pdBear (vgpuDaemon fix & stop & start).
- You can now use the driver normally.
Installation Steps:
Environment Setup
Configuration:
- CPU: Intel i5-10400F
- MEM: 32GB DDR4 2400MHz
- GPU: Tesla P4 & 2080Ti
- OS: Proxmox VE 7.4
On this hardware platform, Proxmox VE virtualization environment is installed, and the vgpu_unlock project is utilized. This project enables Nvidia vGPU experience even on consumer-grade graphics cards like the 2080Ti.
Note: For the installation of Proxmox VE and vgpu_unlock, you can refer to the blog of Fosi, a well-known expert in this field.
Synology Installation
Create a virtual machine in Proxmox VE and perform a regular installation of Synology DVA3221. You can find tutorials for installing Synology on Proxmox VE by searching on major search engines.
Important Note:
-
If you intend to use Synology Surveillance Station, make sure to have a valid serial number ready. Otherwise, the installed system will have a license limit of 0.
-
During the installation of the Synology system, please do not pass the vGPU to the Synology virtual machine.
Driver Installation
After completing the regular installation of Synology, it will automatically install the NVIDIARuntimeLibrary and Surveillance packages. However, you need to uninstall them before proceeding. If it's your first installation, there is a high chance that these packages won't be installed because you haven't created any storage. In this case, create the storage first, and then you can install our driver.
If you reinstall the system on a hard drive with existing Synology data, the system will automatically install the NVIDIARuntimeLibrary and Surveillance. Wait for the installation to finish, and then verify if the available channels for surveillance are correct (if it shows 0, it indicates an issue with the serial number). Once everything is working correctly, you can delete the NVIDIARuntimeLibrary and Surveillance packages and proceed to install the vGPU driver package.
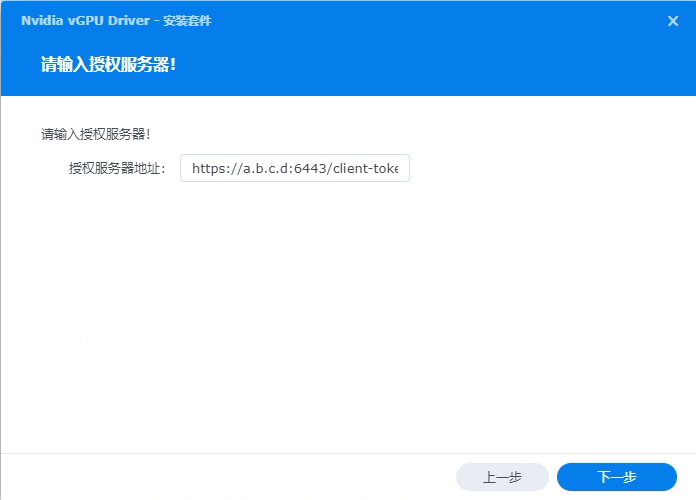
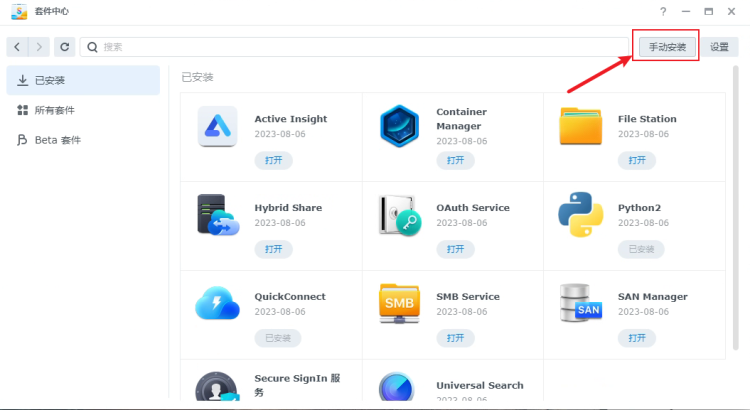 At this step, please modify the authorization server address to your own (If you haven't set it up yet, you can refer to Foxi's blog for instructions). 来自民间的VGPU授权fastapi-dls
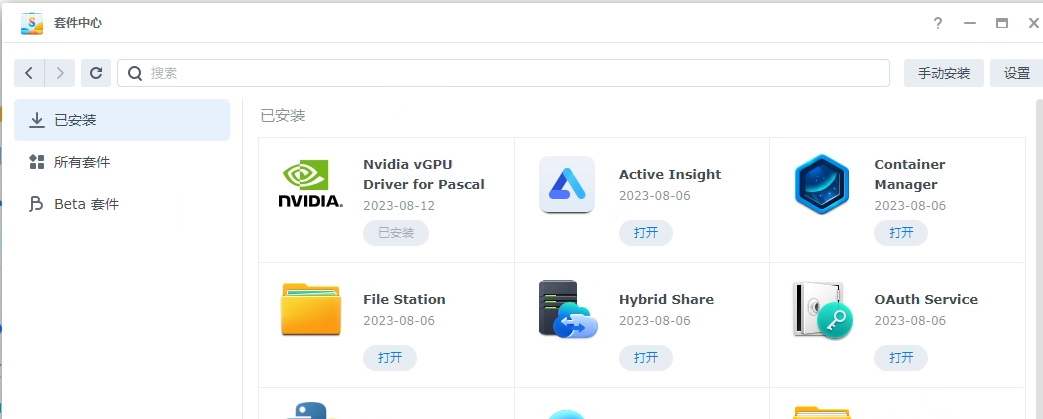
 After the installation is completed, you will be able to see the newly installed driver:
 After the installation is complete, open the SSH function of the system:
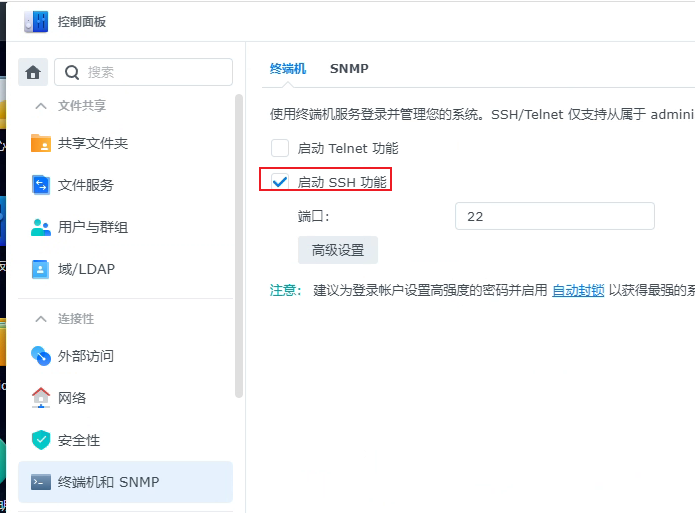 Then use the ssh tool to connect to the Synology system, enter
 sudo -i and enter the password to switch the root account, enter vgpuDaemon fix to repair the permissions.
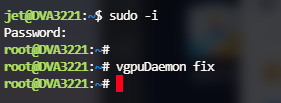 At this time, enter the package center, disable this package, and then enable this package to enable normal use of the vGPU driver. Enter the
 nvidia-smi command in the terminal to verify.
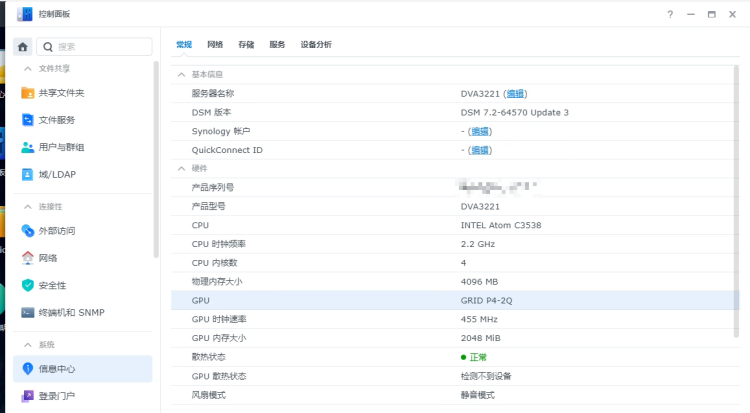
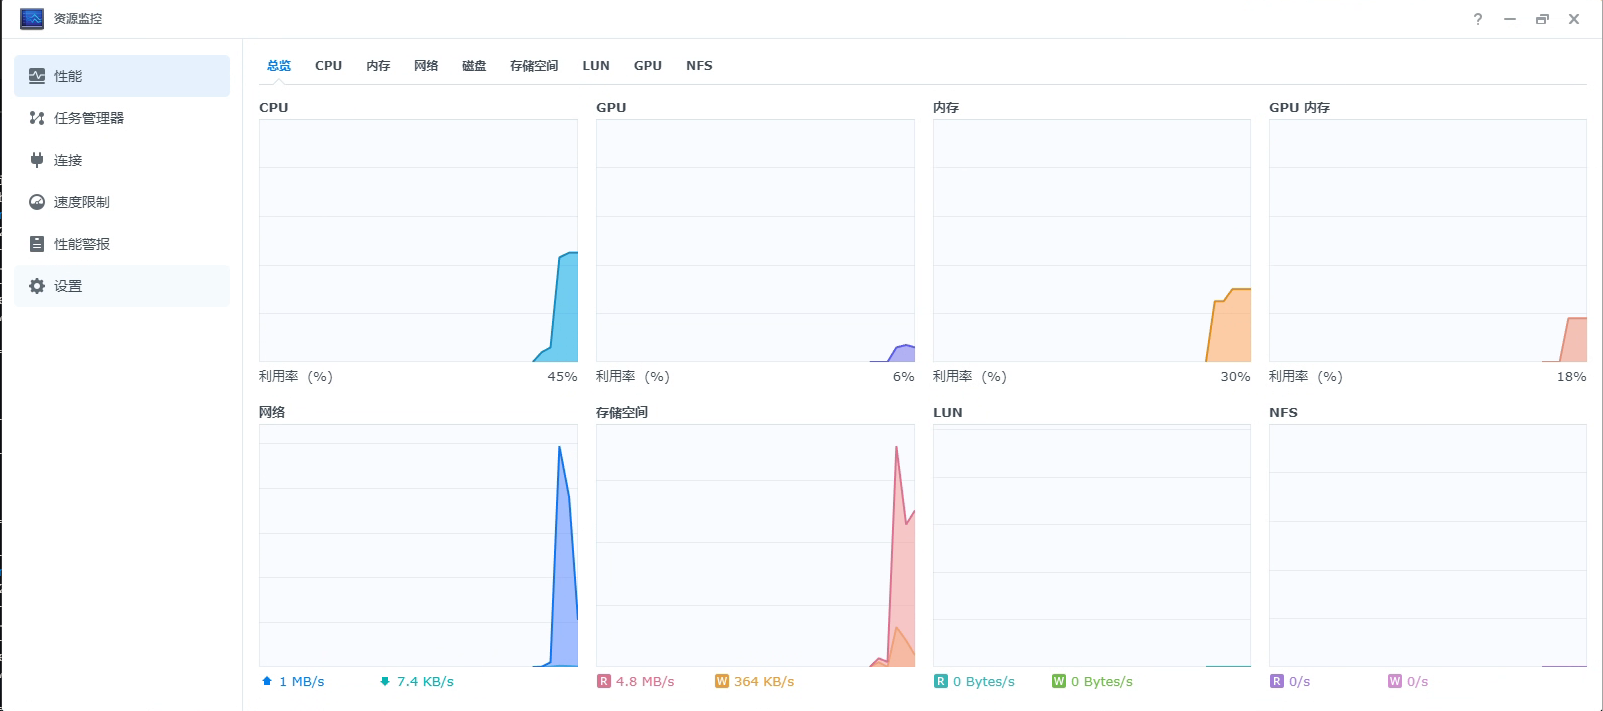
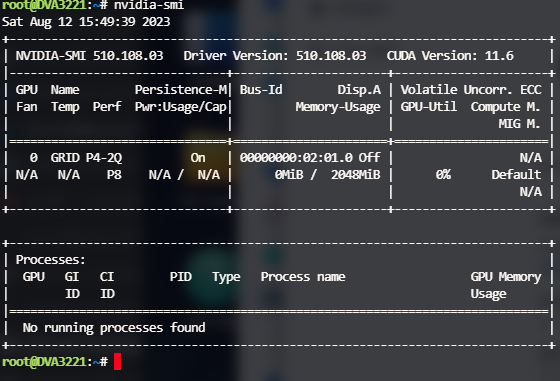 At this time, the Synology system can also normally recognize the relevant information of the GPU:
docker安装
If the system already has the "docker" (Container Manager) suite installed, you simply need to stop the suite and then restart it.
If the system is new and doesn't have the "Container Manager" suite installed, you will need to install it first. Once the installation is complete, stop the suite and then restart it.
However, if you want to enable the use of the vGPU driver for the Docker version of Emby, you will need to enter the startup command in the SSH terminal as the root user (remove the content after each "#" in every line) to start the container:
docker run \
--network=bridge \
-p '8096:8096' \
-p '8920:8920' \
-v /volume1/docker/jellyfin:/config \
-v /volume1/video/:/media \
-e TZ="Asia/Shanghai" \
-e UID=1026 \
-e GID=100 \
-e GIDLIST=0 \
--restart always \
--runtime=nvidia \
-e NVIDIA_VISIBLE_DEVICES=all \
-e NVIDIA_DRIVER_CAPABILITIES=all \
-e UMASK=000 \
--name jellyfin \
-d jellyfin/jellyfin:latest
Here are the three additional commands to use the "nvidia" driver. For other programs like Plex and Emby that also require GPU usage, you can add these three lines to the existing setup:
--runtime=nvidia \
-e NVIDIA_VISIBLE_DEVICES=all \
-e NVIDIA_DRIVER_CAPABILITIES=all \
You can start Emby using the following command:
docker run \
--network=bridge \
-p '8096:8096' \
-v /volume1/docker/emby:/config \
-v /volume/video/:/media \
-e TZ="Asia/Shanghai" \
-e UID=1026 \
-e GID=100 \
-e GIDLIST=0 \
--restart always \
--runtime=nvidia \
-e NVIDIA_VISIBLE_DEVICES=all \
-e NVIDIA_DRIVER_CAPABILITIES=all \
-e UMASK=000 \
--name emby \
-d emby/embyserver:latest
You can start Plex using the following command:
docker run -d \
  --name=plex \
  --net=host \
  -e PLEX_UID=1026 \
  -e PLEX_GID=100 \
  -e TZ=Asia/Shanghai \
  -e VERSION=docker \
  -v /volume1/docker/plex:/config \
  -v /volume1/video/:/media \
  --runtime=nvidia \
  -e NVIDIA_VISIBLE_DEVICES=all \
  -e NVIDIA_DRIVER_CAPABILITIES=all \
  --restart unless-stopped \
  plexinc/pms-docker
Ensure the accuracy of the above instructions. For the meaning of other instructions mentioned above, you can further search on the internet.
The instructions above are executed as follows:
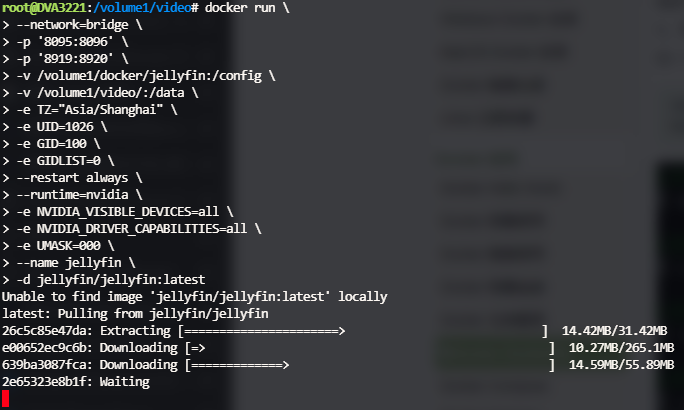 If there are no errors displayed on the interface after the execution, it means that it has been completed. You can see the newly created container in the "Container Manager" of Synology DSM.
To enable NVIDIA decoding in Jellyfin, enter Jellyfin and follow these steps:
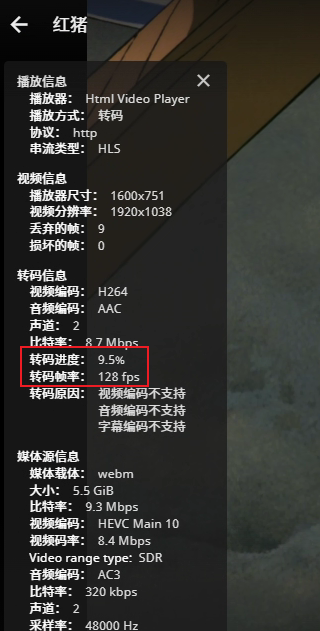
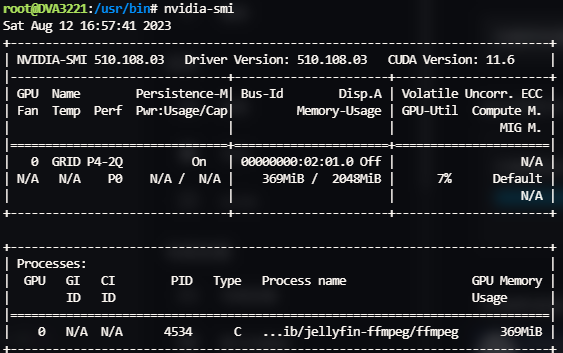 Similarly, in Emby, you can also enable hardware decoding:
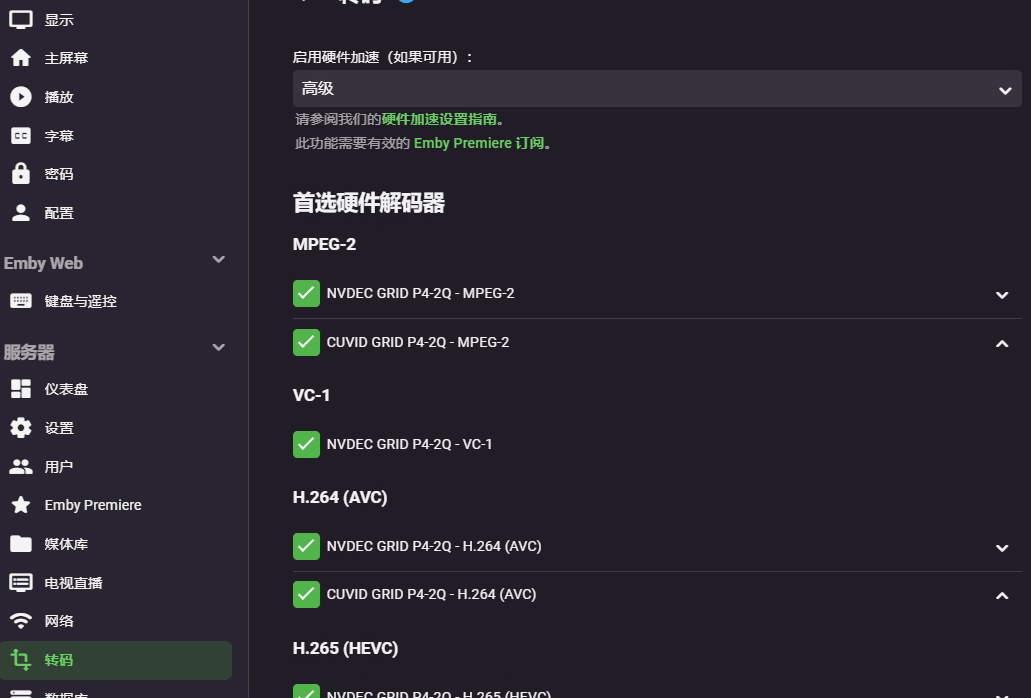
Several questions
Question 1: Why choose the DVA3221 platform instead of others like 3617XS or DS918+?
Answer 1: The DVA3221 platform was chosen because it natively supports Nvidia GPU. The system provides GPU status display in multiple areas, and it includes 8 default licenses for monitoring. Additionally, you can choose to use AI and other functionalities in the monitoring process.
Question 2: What are the differences between the official original version and the modified version by the "imnks"? Answer 2:
- This version supports all the features of the official original version.
- After enabling vGPU functionality, multiple virtual machines can share GPU computing power, which is more efficient than GPU passthrough.
- The decoding and encoding support in this version is more comprehensive. The latest versions of Jellyfin, Emby, and Plex can all enable hardware decoding.
- Docker runtime is integrated, making the startup parameters for the mentioned media servers simpler.
- There is no GDDR6 limitation present in the original version. All the GPUs supported by vGPU 14.4 can be used without any issues.
Regarding the packages
Currently, there doesn't seem to be a conclusive solution for the power consumption issue with the 2080Ti vGPU. Additionally, there seem to be some problems with the AI functionality. Therefore, I will first share the driver package that does not include Synology's AI monitoring. Once all the required functionalities for AI monitoring are tested and concluded, I will release the corresponding package along with the results.
see the github: https://github.com/pdbear/syno_nvidia_gpu_driver
Thanks
感谢佛西群的多位大佬指导,感谢佛西大佬送的五香牛肉干和kxxxm送的酸酸乳。
Help
I have limited abilities and don't have much GPU data. I hope to get help from all of you to assist in conducting some tests and improve the driver better.
Response to the encountered issue
- After a reboot, the suite starts slowly, causing Docker or Emby suite to be unable to use the GPU. (Docker was fixed on August 27, 2023, more testing is required for other suites)
Solution: Manually restart the suite (such as Docker or Emby) that cannot use the GPU. Use the slightly modified script below and set it to start on boot through the task scheduler. I have been quite busy recently, but I will prioritize fixing this issue in the next update when I have some free time.
!/bin/bash

sleep 30
bash /var/packages/ContainerManager/scripts/start-stop-status stop;
bash /var/packages/ContainerManager/scripts/start-stop-status start;
Or (from imnks.com)
synopkg stop ContainerManager
synopkg start ContainerManager
- After a reboot, packages/docker cannot use the GPU, but the GPU is detected as being in use (fixed for docker on August 27, 2023).
Solution:
This issue may be caused by a long delay in downloading the authorization. It is recommended to switch to a locally built authorization server. You can refer to the following address: fastapi-dls
The next version will fix this issue.
About Author:
pdbear([email protected]),Working for a small company, engaged in GPU driver development。


评论区